Landscape: making Pict Harbour campus in X3D
- The making of Kelpie College's 3D environment representing Pict Harbour campus in X3D
- Landscape
- Tower Building
- Old building
- Seagull's eye tour
- Course Orchard
Requirements
The landscape should:
- be easy to navigate by walking;
- be quick to build;
- be easy to maintain and rearrange;
- support a variety of buildings;
- be in character with the Kelpie College scenario;
- demonstrate reuse and scalability;
- demonstrate technology and methodology;
- support greater accessibility in future (with a grid-based layout);
- be very efficient in file size and rendering requirements (so as not to divert resources from more complex modelling allowed elsewhere).
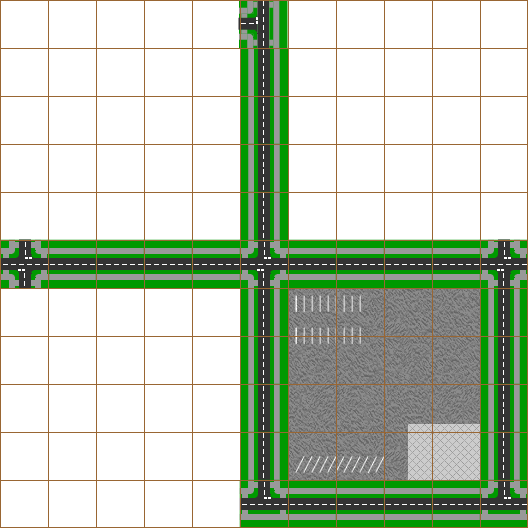
Land and sea
A simple way to divide up the environment was to start with a straight edge of coastline (actually with a harbour front) and work inland from there. Half the environment (at least) is then sea, and land mass can be added a piece at a time.
A tile-based landscape
The idea of a flat, tile-based landscape comes from many toys and games; in particular the LEGO® road sections were an inspiration. Although various geometries could be used, like regular hexagons, a square grid was probably the simplest, and worked well with the coordinate system. X3D uses metres as the unit of measurement.
A basic 24 metre square tile system was chosen. The number 24 is easily divisible, and about right for an urban road system on looking at satellite maps. Larger square tiles of 96 metres could sit within the road grid (four road tiles on each side).
For the purposes of cleaner joins, the tiles were built slightly oversized at 24.1 metres square, so that they would overlap.
The bitmap images were made to 480 pixels square, and oversized to 482. This gives a resolution of 20 pixels per metre. This meant you could have road markings as narrow as 5 cm, for example.
The larger tiles, like that for the main buildings, might still use a 480 pixel texture map, which means less detail as this is spread over a larger area.
Example tile: road T-junction
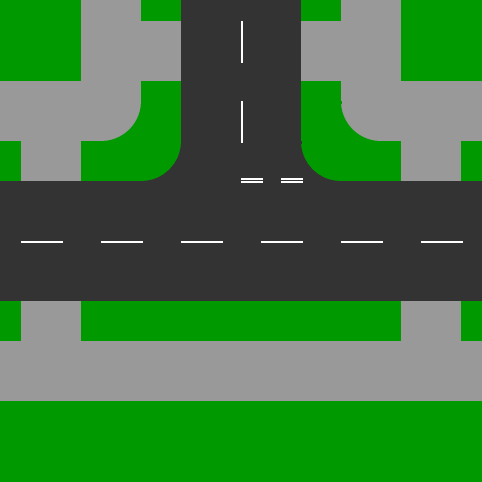 A texture map, 482 pixels square, depicting a road T junction.
The tiles were created with internal X3D prototypes, with an optional rotation fed into each instance as a parameter. This is to allow the tile to be rotated in increments of 90°. Here is the code:
<ProtoDeclare name="LandTileRoadJunctionPrototype">
  <ProtoInterface>
    <field name="transformRotationTile" accessType="inputOutput" type="SFRotation"/>
  </ProtoInterface>
  <ProtoBody>
    <Transform center="0 0 0">
      <IS>
        <connect nodeField="rotation" protoField="transformRotationTile"/>
      </IS>
      <Shape>
        <Box size="24.1 0.1 24.1" solid="true"/>
        <Appearance>
          <ImageTexture repeatS="false" repeatT="false"
url="http://www.kelpiecollege.org.uk/pictcelt/pict/campus/images/textures/tile_road_junction.png"/>
        </Appearance>
      </Shape>
    </Transform>
  </ProtoBody>
</ProtoDeclare>
Next: Tower Building: making Pict Harbour campus in X3D.
Last updated: 2011-03-02.